How UV Exposure Testing Predicts Real-World Durability
UV damage is relentless, and it rarely shows up on day one
A polymer part can look flawless at launch and still fail in the field. UV damage works like slow mechanical fatigue: you do not notice the early hits, then one day the surface chalks, the color shifts, the gloss drops, or a once-tough plastic snaps with a brittle fracture.
Here is the challenge we see across the automotive supply chain: materials can pass initial appearance and basic mechanical checks in the lab, yet drift out of spec after months of sunlight, heat, and humidity. The road does not care that your first articles looked great.
Accelerated UV Testing exists to close that gap. Done correctly, it compresses real-world sunlight exposure into a controlled, repeatable lab program that helps you predict durability, verify OEM compliance, and avoid expensive surprises after tooling and launch.
This is a practical guide. We will cover what UV is doing to materials, how accelerated weathering works, which automotive standards matter, and how to build a UV testing program that produces results you can defend in design reviews and audits.
The UV threat: what you are testing against
What UV radiation is in plain terms
Sunlight is not just “light.” It is a mix of electromagnetic energy across wavelengths. The portion we call ultraviolet (UV) carries more energy than visible light. That extra energy is why UV is so effective at triggering chemical changes in polymers, coatings, inks, and adhesives.
A useful mental model is to think of UV as a steady stream of tiny impacts at the molecular level. You will not see the first million impacts. You will see the cumulative damage once key bonds have been broken and the material’s chemistry has changed.
How UV breaks polymers and coatings (photodegradation)
Photodegradation is the umbrella term for material breakdown driven by light exposure. In many plastics and coatings, UV can create free radicals, break polymer chains (chain scission), or promote unwanted crosslinking. Oxygen, heat, and moisture often accelerate these reactions, which is why UV testing typically includes temperature and humidity control, and sometimes water spray or condensation cycles.
Common failure modes: fading, chalking, cracking, embrittlement, strength loss
Different materials show UV damage in different ways. Typical outcomes we evaluate (depending on the method and component) include:
- Color fading and yellowing in pigmented plastics, painted parts, and interior trims.
- Gloss loss and chalking when binders degrade and fillers or pigments become exposed at the surface.
- Surface cracking and crazing that can start as cosmetic defects and progress into functional failures.
- Loss of mechanical properties such as tensile strength, elongation, or impact performance after exposure.
- Embrittlement where parts that once flexed now fracture under normal loads.
For many automotive programs, the real concern is not just “does it look different?” It is whether the part stays within a performance window long enough to meet warranty and customer expectations.
Why location and use-case matter (Arizona vs. Michigan, interior vs. exterior)
UV exposure is not uniform. Geography and application change the stress profile dramatically.
- High-sun markets (for example, Arizona) deliver higher UV dose and higher cabin temperatures, accelerating interior fade and embrittlement.
- Four-season climates (for example, Michigan) may have lower annual UV dose but introduce thermal cycling, road grime, and moisture swings that change failure modes.
Application matters just as much:
- Dashboards and door panels sit behind glass, experience extreme heat soak, and can show rapid color drift or gloss change that customers notice immediately.
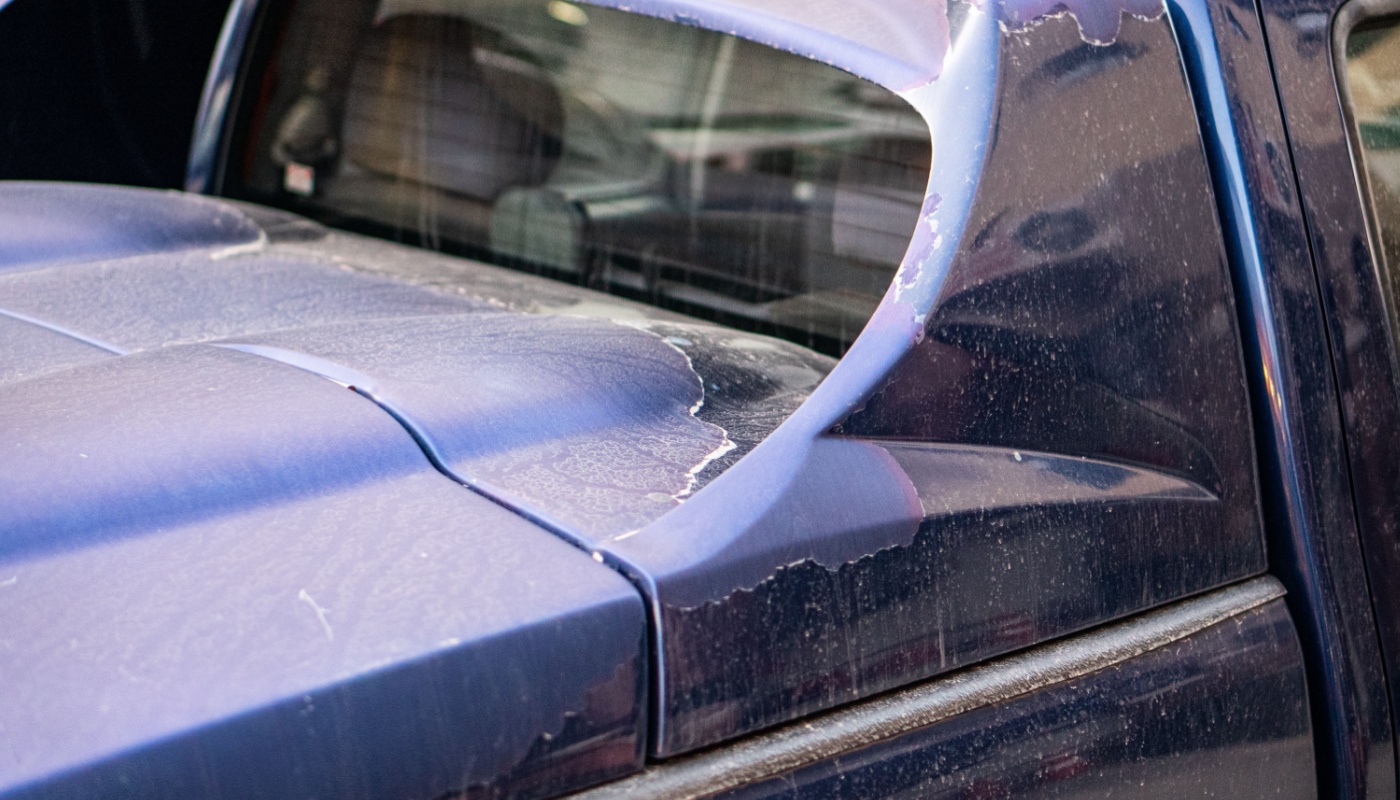
- Exterior trim and coatings see direct UV, rain, and temperature swings, which can drive chalking, clearcoat degradation, and adhesion problems.
- Interior components often need tight color match and low haze change, while exterior parts may prioritize gloss retention, coating integrity, and long-term surface stability.
Good UV exposure testing replicates the stress environment that matters for the part, not a generic “sunlight” assumption.
The science behind accelerated UV testing
The core idea: concentrate stress, then measure response
Accelerated weathering takes the same basic degradation drivers found outdoors (UV radiation, heat, moisture) and applies them in a controlled, repeatable cycle. By increasing irradiance (light intensity) and optimizing exposure conditions, you can simulate months or years of outdoor stress in weeks or months.
Two important clarifications help set expectations:
- Acceleration is not magic. It is controlled severity. If you accelerate too aggressively, you can create failure modes that do not occur outdoors.
- Correlation depends on context. The best programs tie lab exposure to known field performance for a given material family and application.
Xenon arc testing: closest lab simulation of natural sunlight
Xenon arc weathering uses a xenon lamp and optical filters to produce a spectral power distribution that closely matches natural sunlight. In practical terms, xenon arc is often selected when you need a strong “real sun” simulation across UV and visible wavelengths, including the wavelengths that drive color change.
Common xenon arc standards and automotive methods include:
- ASTM G155: Standard practice for operating xenon arc light apparatus.
- SAE J2527: Performance-based accelerated exposure of automotive exterior materials using xenon arc.
- ISO 4892-2: Plastics exposure to laboratory light sources (xenon arc).
- SAE J1885, SAE J1960: Widely referenced xenon arc test methods for automotive materials.
- Ford FLTM methods and GM GMW methods (application-specific requirements).
In day-to-day program work, xenon arc is a go-to method for exterior trim, coated parts, and interior components where appearance retention matters.
Carbon arc testing: where it still matters and why it is specified
Carbon arc testing is an older weathering technology that uses a carbon arc light source. While xenon arc is common for sunlight simulation, carbon arc still appears in legacy requirements and certain specifications where historical continuity matters.
Standards you will see include:
- ASTM G152: Standard practice for operating open flame carbon arc light apparatus.
- ASTM G153: Standard practice for operating enclosed carbon arc light apparatus.
When a customer or OEM calls out carbon arc, it is usually because their acceptance limits and historical data were built around that method. Matching the specified method protects comparability across programs.
Key parameters that control severity and realism
UV exposure testing is not just “turn on the lamp.” The output depends on several controlled parameters, including:
- Irradiance (light intensity at specific wavelengths): This drives the UV dose rate.
- Black panel or black standard temperature: A proxy for the surface temperature that influences reaction rates.
- Chamber air temperature: Helps control overall thermal environment.
- Relative humidity and moisture cycles: Moisture can accelerate hydrolysis, promote surface changes, and drive coating defects.
- Spray cycles or condensation: Used to simulate rain, dew, and wet-dry stress that interacts with UV.
- Light-dark cycles: Useful when standards require a diurnal-like exposure pattern or moisture recovery periods.
Think of these settings as the knobs that let you tune the test. Turn the knobs without a plan, and you can get results that are precise but not meaningful.
Calibration, control, and correlation: how accuracy is established
The most common question we hear is: “How do we know accelerated testing is accurate?” The honest answer is that accuracy comes from three layers of discipline:
- Calibration and control: The chamber must hold irradiance, temperature, and humidity within specified tolerances. This is where disciplined maintenance, verification, and traceable instrumentation matter.
- Standardized methods: ASTM, SAE, ISO, and OEM procedures define how to run the exposure so results are comparable across time and labs.
- Correlation and validation: Organizations compare lab exposure outcomes to known field results, or they run side-by-side studies using reference materials to confirm that the apparatus produces expected degradation patterns.
Accelerated UV testing does not “predict the future” in a single number. It gives you a controlled way to compare materials, verify process stability, and estimate risk before you commit to high-cost decisions.
OEM compliance requirements: meeting industry standards
Why OEMs publish their own UV and weathering methods
Automotive OEMs live in the space between engineering and brand reputation. A faded interior or chalked exterior trim is not just a test failure. It is a customer-visible quality problem. That is why OEMs publish specific UV and weathering requirements tied to their platforms, materials, supply chains, and historical field data.
In practice, OEM methods often adjust exposure cycles, target irradiance, moisture steps, or evaluation criteria to better reflect their expectations and warranty assumptions.
Major automotive methods we run and see in the field
Our clients commonly need UV and weathering testing aligned to requirements such as:
- Ford: FLTM BN 017-02, BN 117-01, BN 117-03, BO 116-01.
- GM: GMW14162, GM9125P.
- Honda: HES D6501, HES D6511.
- Toyota: TSL 0601G.
- Nissan: NES M0135, NES M0142.
- SAE standards: J1885, J1960, J2412, J2527.
- Other manufacturers: Newer OEMs such as Rivian and Tesla may reference SAE/ASTM/ISO frameworks, internal methods, or supplier-specific validation plans.
We recommend confirming the latest revision level with the OEM or your customer. A small change in method revision can change cycle parameters or reporting requirements.
What these standards are typically measuring
Most OEM and industry methods aim to control exposure and define what “acceptable” looks like after testing. Evaluation can include:
- Appearance changes such as color shift (often ΔE), gloss retention, haze, or chalk rating.
- Mechanical retention such as tensile properties, impact performance, or flexibility after exposure.
- Coating performance such as adhesion retention, cracking, blistering, or delamination.
- Optical performance for lenses and clear components, including clarity and haze change.
In other words, the test does not only ask “did it degrade?” It asks “did it degrade beyond the customer’s tolerance?”
Why ISO/IEC 17025:2017 (A2LA) accreditation changes the risk profile
OEM compliance is not just about running the right cycle. It is about producing results that are defensible and accepted.
An A2LA accredited lab operating under ISO/IEC 17025:2017 provides:
- Validated methods and controlled procedures so the test is performed consistently.
- Traceability for key measurements and equipment control.
- Documented competence through audits and ongoing proficiency expectations.
- Audit-ready reporting that reduces back-and-forth with customers and helps prevent re-testing.
For quality and procurement teams, accreditation is a risk management tool. It lowers the odds that a report gets questioned when timelines are tight.
Real-world applications: what UV testing reveals
Interior components: dashboards, door panels, seating surfaces
Interior materials are often judged first by the eye. UV exposure can shift color, change gloss, and alter surface texture. In a vehicle cabin, UV comes through glass and combines with high heat soak. That combination can accelerate plasticizer migration, surface oxidation, and visible fade.
Accelerated UV testing helps predict:
- Color stability of instrument panels, door panels, and consoles.
- Surface appearance changes in soft-touch coatings.
- Material stability for seating trims and interior textiles (where applicable).
Exterior components: trim, coatings, lenses, graphics
Exterior parts face direct sun, water, and temperature swings. UV can degrade polymers, but it can also expose weaknesses in coatings and interfaces.
Programs commonly focus on:
- Paint and coating durability, including gloss retention, chalking resistance, and adhesion.
- Exterior trim stability for grilles, claddings, and pillar appliques.
- Lens and clear component clarity, where haze and yellowing can create functional and compliance concerns.
- Graphics and markings where legibility and appearance are customer-visible.
Under-hood parts: housings, hoses, protective covers
Under-hood is often framed as a heat and fluid environment, but UV still matters for components exposed during service, parts near openings, or assemblies that see sunlight during storage and logistics. UV exposure can also be part of broader environmental validation where combined stresses are evaluated.
UV testing can reveal early embrittlement or property drift in:
- Connector housings and protective covers.
- Hoses, boots, and polymer shields used near openings.
- Labels and markings that must remain legible.
Typical durations and what they are meant to represent
Test durations are usually specified by the OEM method or customer requirement (for example, a defined number of hours, cycles, or a target radiant exposure). The “real-world equivalent” depends on the cycle severity, the material’s chemistry, and the application.
What matters operationally is this: the duration should be long enough to discriminate between a robust formulation and a risky one, without creating unrealistic degradation. If you are using the exposure as a material down-select tool, you may want multiple checkpoints (for example, intermediate and end-of-test evaluations) so you can see when degradation begins, not just where it ends.
How testing supports material selection and validation decisions
In practical terms, UV testing helps teams make three kinds of decisions with confidence:
- Material selection: Compare candidate resins, stabilizer packages, pigments, or coatings under the same exposure and evaluation methods.
- Supplier validation: Confirm that alternate sources or manufacturing sites perform equivalently.
- Change control: Validate formulation changes, recycled content shifts, or process changes without betting the program on assumptions.
Most importantly, accelerated UV testing finds problems early. That is before tooling is final, before production ramps, and well before the cost curve turns against you with warranty claims and customer dissatisfaction.
Industry best practices: getting the most from UV testing
When to test (and when to retest)
If you only test at the end of development, you are using UV exposure as a surprise detector. A better approach is to treat UV as a decision tool throughout development. Common triggers include:
- New material or new colorway introduction.
- Material formulation changes, including stabilizer or pigment changes.
- Supplier changes, plant transfers, or significant process changes.
- New market launches where UV dose and thermal profile differ materially.
How to design a test plan that answers the real question
Before selecting a method, define the decision you need to make. For example: “Will this dashboard skin hold color within ΔE limits after the specified exposure?” or “Is supplier B equivalent to supplier A for this exterior trim?”
From there, build the plan around:
- The required standard (OEM method, SAE, ASTM, or ISO) and the current revision.
- Representative specimens that match production thickness, surface texture, and pigment/coating system.
- Exposure duration and checkpoints that reflect the decision timeline and risk level.
- Evaluation methods for color, gloss, haze, adhesion, or mechanical testing, as applicable.
If you are unsure which method is most appropriate, that is a normal moment to involve your lab early. Method selection is where many programs either gain clarity or accumulate rework.
Controls, references, and acceptance criteria that hold up in audits
Good accelerated aging programs do not rely on a single set of parts with no context. Best practice is to include controls and to define acceptance criteria in advance.
- Control samples from a known “good” material help confirm the exposure is behaving as expected.
- Reference materials can support correlation and provide continuity across programs.
- Clear acceptance criteria (for example, maximum color change, minimum gloss retention, no cracking) prevent subjective end-of-test debates.
Pairing UV with other environmental stresses
UV rarely acts alone. For many automotive parts, the most realistic failures show up when UV is combined with other stresses, such as heat aging, humidity exposure, chemical resistance, or thermal cycling.
Sequencing matters. A coating that looks stable after UV may fail adhesion after subsequent humidity cycling. If your field environment includes both, your validation plan should also include both.
Documentation, traceability, and communicating with your lab
OEM programs can move fast. Documentation keeps them from moving backward.
To avoid delays, we recommend providing your lab with:
- The full method callout and revision level.
- Material identifiers, lot numbers, and any relevant process notes.
- Sample orientation requirements (if applicable) and any masking instructions.
- The evaluations you need at each checkpoint (color, gloss, adhesion, tensile, etc.).
In return, you should expect clear confirmation of the planned exposure cycle, reporting format, and turnaround time. That is how you keep procurement, engineering, and quality aligned.
Beyond pass or fail: using UV data strategically
Reading results with context, not just numbers
A UV exposure report is a decision document. Use it that way. Look for trends over time, not just the final measurement. Early drift can be a warning sign, even if the end point still meets the limit.
Comparing materials and suppliers fairly
Material comparisons only work when exposure conditions and evaluation methods are consistent. If you change the cycle, the specimen thickness, or the measurement geometry, you may be comparing the test setup more than the materials.
For supplier evaluation, accelerated UV testing can be a practical filter that reduces the risk of switching based on cost alone.
Warranty and lifecycle planning using test evidence
Test results can feed lifecycle planning when paired with field data and engineering judgment. If one formulation shows significantly better retention of color, gloss, or impact properties at relevant exposures, it can reduce the probability of customer complaints and warranty action.
Cost-benefit: the price of testing versus the price of a field problem
The return on UV testing is easiest to see when you compare it to downstream costs:
- Tooling changes and production disruption after a late discovery.
- Scrap and rework from unstable material lots.
- Warranty claims, dealer labor, and brand impact from visible fade or cracking.
Accelerated UV testing is a controlled expense. Field failures are not.
Building a repeatable knowledge base across programs
Over time, organizations that treat UV exposure as a learning loop build real leverage. They can answer questions faster: which pigment package is stable, which supplier is consistent, and which cycle best correlates to a target application. That shortens development and reduces debate, because the evidence is already on file.
The GPTesting advantage: credible UV testing with practical support
At Ghesquiere Plastic Testing, Inc. (GPTesting), we support automotive suppliers who need results that are accurate, fast, and accepted by their customers.
What our clients rely on:
- Comprehensive UV exposure capability including xenon arc and carbon arc testing.
- A2LA accreditation to ISO/IEC 17025:2017, supporting credibility and OEM acceptance.
- Experience with automotive OEM standards and the practical realities of program timing.
- Fast turnaround with disciplined control, because speed only helps when the result is defensible.
- A partnership approach: we help clients choose methods, confirm requirements, and interpret results in plain language.
If your requirement is clear, we run the test. If it is not clear, we help you make it clear before you spend time and budget on the wrong exposure.
Your next step: de-risk durability before it becomes a warranty claim
UV exposure is one of the most predictable causes of long-term cosmetic and functional drift in automotive materials. When you use accelerated UV testing correctly, you gain a controlled window into how a material will age, and you make better decisions earlier.
Key takeaways to keep:
- UV drives real chemical change, not just surface appearance shifts.
- Accelerated UV testing works when the method, parameters, and evaluation match the application.
- OEM standards matter because they encode field experience and acceptance limits.
- Accreditation matters because your results must stand up to customer scrutiny.
If you want to discuss the right UV exposure method for your part, your OEM requirement, or your timeline, we are ready.
Contact: Eric Christopher
Phone: 313-885-3535
Email: eric.c@gptesting.com